使用 Vaadin、Spring、jOOQ 和 PostreSQL 构建多租户应用程序架构
💡一则或许对你有用的小广告
欢迎加入小哈的星球 ,你将获得:专属的项目实战 / 1v1 提问 / Java 学习路线 / 学习打卡 / 每月赠书 / 社群讨论
- 新项目:《从零手撸:仿小红书(微服务架构)》 正在持续爆肝中,基于
Spring Cloud Alibaba + Spring Boot 3.x + JDK 17...,点击查看项目介绍 ;- 《从零手撸:前后端分离博客项目(全栈开发)》 2 期已完结,演示链接: http://116.62.199.48/ ;
截止目前, 星球 内专栏累计输出 82w+ 字,讲解图 3441+ 张,还在持续爆肝中.. 后续还会上新更多项目,目标是将 Java 领域典型的项目都整一波,如秒杀系统, 在线商城, IM 即时通讯,权限管理,Spring Cloud Alibaba 微服务等等,已有 2900+ 小伙伴加入学习 ,欢迎点击围观
在本教程中,我们将为多租户架构整合一个完整的应用程序堆栈。
我们将使用:
- 用于 UI 的 Vaadin 和 Vaadin-Spring
- 用于存储的 Postgres
- 数据层的 jooq
- 用于身份验证的 Spring-Security
- 一些胶水魔法来处理多租户
您可以在 Github 上找到此示例的完整源代码。我不会详细介绍所使用的不同技术,而是将重点放在架构设置和租赁逻辑的实现上。
我们基本上从 vaadin-spring-security 示例开始,您可以在 vaadin4spring 存储库 中找到该示例。
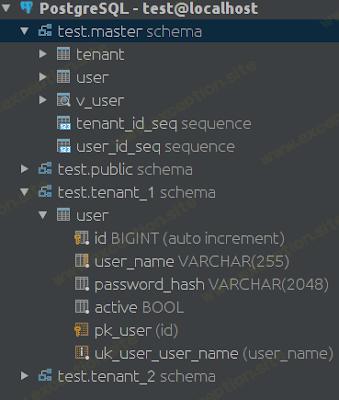
此示例为我们提供了基于 spring 的 vaadin 应用程序的基本设置,它能够使用 spring security 对用户进行身份验证。对于多租户,我决定选择这样的 schema-per tenant 解决方案:
主模式包含所有表的表定义,租户模式继承这些定义以确保我们在所有租户之间拥有一致的数据结构。所有数据库对象都使用 liquibase 脚本进行管理。 Liquibase 是一种数据库重构工具,如果您从未听说过它,请访问 http://www.liquibase.org/ 自行了解。 master.tenant 表包含有关现有租户及其数据库连接属性的信息。对于每个租户模式,liquibase 创建了一个相应的数据库用户,该用户具有有限的权限并且只能访问他自己的租户模式。
eg 的 master.user 表是这样创建的:
 <changeSet author="thomas" id="master-create-table-user">
    <createTable tableName="user" schemaName="master" >
        <column name="id" type="BIGINT" autoIncrement="true"/>
        <column name="user_name" type="varchar(255)"/>
        <column name="password_hash" type="varchar(2048)"/>
        <column name="active" type="boolean" defaultValue="false"/>
    </createTable>
</changeSet>
tenant_xx.user 表定义为:
 <changeSet author="thomas" id="master-create-table-user">
    <createTable tableName="user" schemaName="master" >
        <column name="id" type="BIGINT" autoIncrement="true"/>
        <column name="user_name" type="varchar(255)"/>
        <column name="password_hash" type="varchar(2048)"/>
        <column name="active" type="boolean" defaultValue="false"/>
    </createTable>
</changeSet>
通过这种继承技巧,我们确保所有租户中表的实际结构保持同步,此外,正如我们稍后将看到的,我们能够从主模式查询所有租户。
github 示例中的 liquibase 脚本创建了两个租户(tenant_1 和 tenant_2)和一个管理员用户。为简单起见,admin 用户名与租户名相同,密码只是“admin”。因此,如果您尝试运行该示例,您可以以 tenant_1/tenant_1/admin 身份登录。
现在我们有了一个基本的数据库模式。 liquibase 脚本需要一些调整才能不仅在 postgres 上运行,而且在 hsqldb 上运行。我们至少需要这个来进行单元测试,但我们也希望能够生成我们的 jooq 映射和 dsl,而不必在我们的构建服务器上运行 postgresql 服务器。
运行 maven 构建在临时 hsqldb 实例上创建主模式,然后运行 jooq 代码生成器。这个想法来自 http://stanislas.github.io/2014/08/23/liquibase-and-jooq.html
在我们现在可以进入多租户的东西之前,这就是我们需要的所有基本东西。我想从连接的角度将租户完全分开。所以每个租户都有自己的受限数据库用户和自己的连接池。这有一些缺点,因为我们可能会得到很多连接池,但优点是,无论您尝试如何处理从 spring 获得的租户连接,您永远无法接触到另一个租户您经过身份验证的那个。 TenantDataSource 是一个简单的代理包装器,可根据当前的 spring 身份验证对象将您路由到正确的连接池。这是一个片段:
 <changeSet author="thomas" id="master-create-table-user">
    <createTable tableName="user" schemaName="master" >
        <column name="id" type="BIGINT" autoIncrement="true"/>
        <column name="user_name" type="varchar(255)"/>
        <column name="password_hash" type="varchar(2048)"/>
        <column name="active" type="boolean" defaultValue="false"/>
    </createTable>
</changeSet>
注入的 TenantAuthentication 是围绕 SpringSecurityContextHolder 的 Authentication 对象的代理 Bean:
 <changeSet author="thomas" id="master-create-table-user">
    <createTable tableName="user" schemaName="master" >
        <column name="id" type="BIGINT" autoIncrement="true"/>
        <column name="user_name" type="varchar(255)"/>
        <column name="password_hash" type="varchar(2048)"/>
        <column name="active" type="boolean" defaultValue="false"/>
    </createTable>
</changeSet>
使用事务管理连接 jooq 和 spring 有点费力,我按照 http://www.jooq.org/doc/3.6/manual/getting-started/tutorials/jooq-with-spring/ 中的说明解决了它
我们必须解决的最后一步是将 jooq 模式映射到当前经过身份验证的用户的模式。我用 jooq DSLContext 的代理 bean 再次解决了这个问题:
 <changeSet author="thomas" id="master-create-table-user">
    <createTable tableName="user" schemaName="master" >
        <column name="id" type="BIGINT" autoIncrement="true"/>
        <column name="user_name" type="varchar(255)"/>
        <column name="password_hash" type="varchar(2048)"/>
        <column name="active" type="boolean" defaultValue="false"/>
    </createTable>
</changeSet>
现在我们可以将这个 dsl 注入到任何数据访问对象中,并且我们确信我们将始终访问当前用户的模式,使用仅被授权访问该模式的连接:
 <changeSet author="thomas" id="master-create-table-user">
    <createTable tableName="user" schemaName="master" >
        <column name="id" type="BIGINT" autoIncrement="true"/>
        <column name="user_name" type="varchar(255)"/>
        <column name="password_hash" type="varchar(2048)"/>
        <column name="active" type="boolean" defaultValue="false"/>
    </createTable>
</changeSet>
最后,我们需要一种对用户进行身份验证的形式。这是使用 spring AuthenticationProvider 和一个视图直接完成的,该视图让我们可以读取租户模式中的所有用户:
 <changeSet author="thomas" id="master-create-table-user">
    <createTable tableName="user" schemaName="master" >
        <column name="id" type="BIGINT" autoIncrement="true"/>
        <column name="user_name" type="varchar(255)"/>
        <column name="password_hash" type="varchar(2048)"/>
        <column name="active" type="boolean" defaultValue="false"/>
    </createTable>
</changeSet>
如果您想深入了解漂亮的细节,请查看 github 中的示例!
 异常教程
异常教程
